Creating a Video Clip Using the Live Module
Overview
The Live module provides the ability to create video clips from completed events. Clips can also be created while a live event is in progress. There are several reasons you might want to create a clip:
- To create a short, teaser clip that can be posted to social media
- To limit the length of a video that you want to post (most platforms limit the length of videos)
- You have found that shorter videos perform better on social media
Clipping can be done with all types of live events and it can also be done during and after the live stream using the Live API or the Live Module.
Both the Live Module and the Live API support creating clips from encrypted or DRM-protected jobs.
Notes
- Legacy ingest profiles no longer support live clipping. To create a video clip from a live stream, make sure your account is enabled for Dynamic Delivery and use a Dynamic Delivery ingest profile.
- Clips can only be created within 7 days of the event end. Afterwards, the Create Clip button will be disabled. If the event is longer than 24 hours, only the last 24 hours are clippable.
- For recurring events: If during the 7 days after an event the event is reactivated, the clipping will only be available for the content of the most recent event. There will be no way to create clips from the prior event, even if it's under 7 days after the last event was deactivated.
- If you stop and restart a channel for a new live stream, the previous live stream information for clipping may be overwritten.
- Clips with a start time less than 10 seconds into the stream cannot be created.
- Clipping is not supported when using the Safari browser.
- Clipping is not available for AES encrypted streams.
- Clipping is not supported for streams using HEVC/H.265 renditions. Attempting to clip an HEVC job will display the error: "Clipping is not supported for streams using HEVC/H.265 renditions."
Automated captions are not shown in the live clipping page, but once generated, clips can use VOD auto-captions for more control of captioned content.
Navigating the clip editor
To open the clip editor, open the Live module, click on an event name and then click Create Clip in the left navigation. The clip editor will open.
Note that all times in the clipping interface are based around the UTC time that the video data was received by Brightcove. This is a necessary adjustment to account for streams that have exceeded the VOD window (run more than 24 hours). When a video has exceeded that window, the time we get back from the player can no longer reliably be used to generate clips.
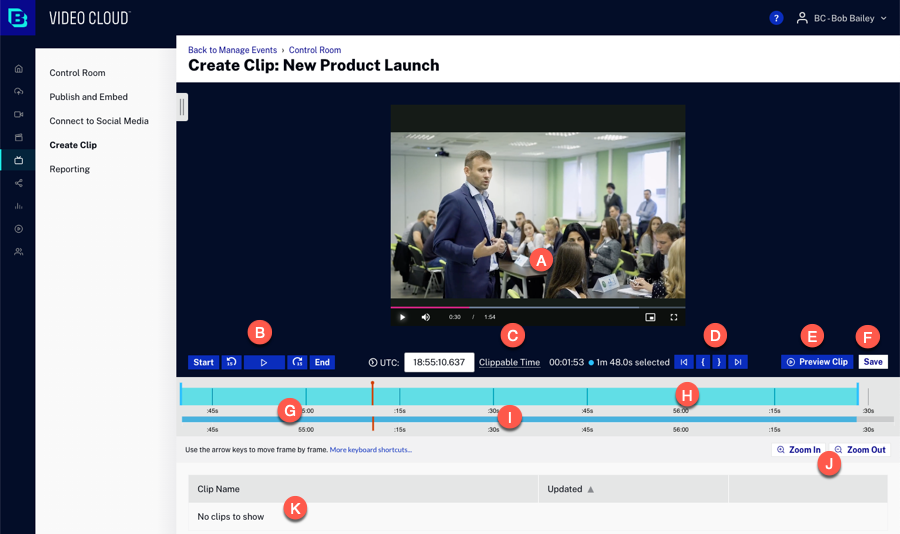
The clip editor is organized as follows:
- A - Preview player
- B - Playback control buttons
- C - Clip time
- D - Clipping buttons
- E - Preview clip button
- F - Save button
- G - Playhead
- H - Focus timeline
- I - Context timeline
- J - Zoom buttons
- K - List of clips
Creating a clip
When creating clips, the highest quality rendition from the selected Live Ingest Profile is used as the source for the clip. The default uploading ingest profile for the account is used when creating renditions for the clip.
Clips automatically carry over the following from the live stream into the VOD clip:
- Multiple audio tracks - when the live stream includes more than one audio track (for example, multiple languages or a described-audio track), those audio tracks are included in the clip. For details on configuring multiple audio tracks on a live stream, see Multi Language Audio with the Live API.
- Closed captions - closed captions present in the live stream are included in the clip.
- Subtitles - subtitle tracks, including automatically generated subtitles, are included in the clip.
Follow these steps to create a clip.
-
Using the clipping buttons or shortcut keys, set the start and end points for the clip.
Click Save.
-
Enter the clip video properties.
- Clip Name — Name of the clip
- Short Description — Description of the clip
- Tags — Tags to associate with the clip
- Reference ID — Reference ID to assign to the clip
-
Output Destination — By default, clips are transcoded and saved to your Video Cloud account. Optionally, you can specify an S3 output by providing an S3 URL (e.g.
s3://bucket/path), in which case the clip is written directly to your S3 bucket and is not ingested into Video Cloud.
-
Enter any required custom field values.
-
Check Remove Source Ad Break Content to remove ad breaks triggered within the clip, keeping only program content. This option will only appear when the stream is SSAI enabled.
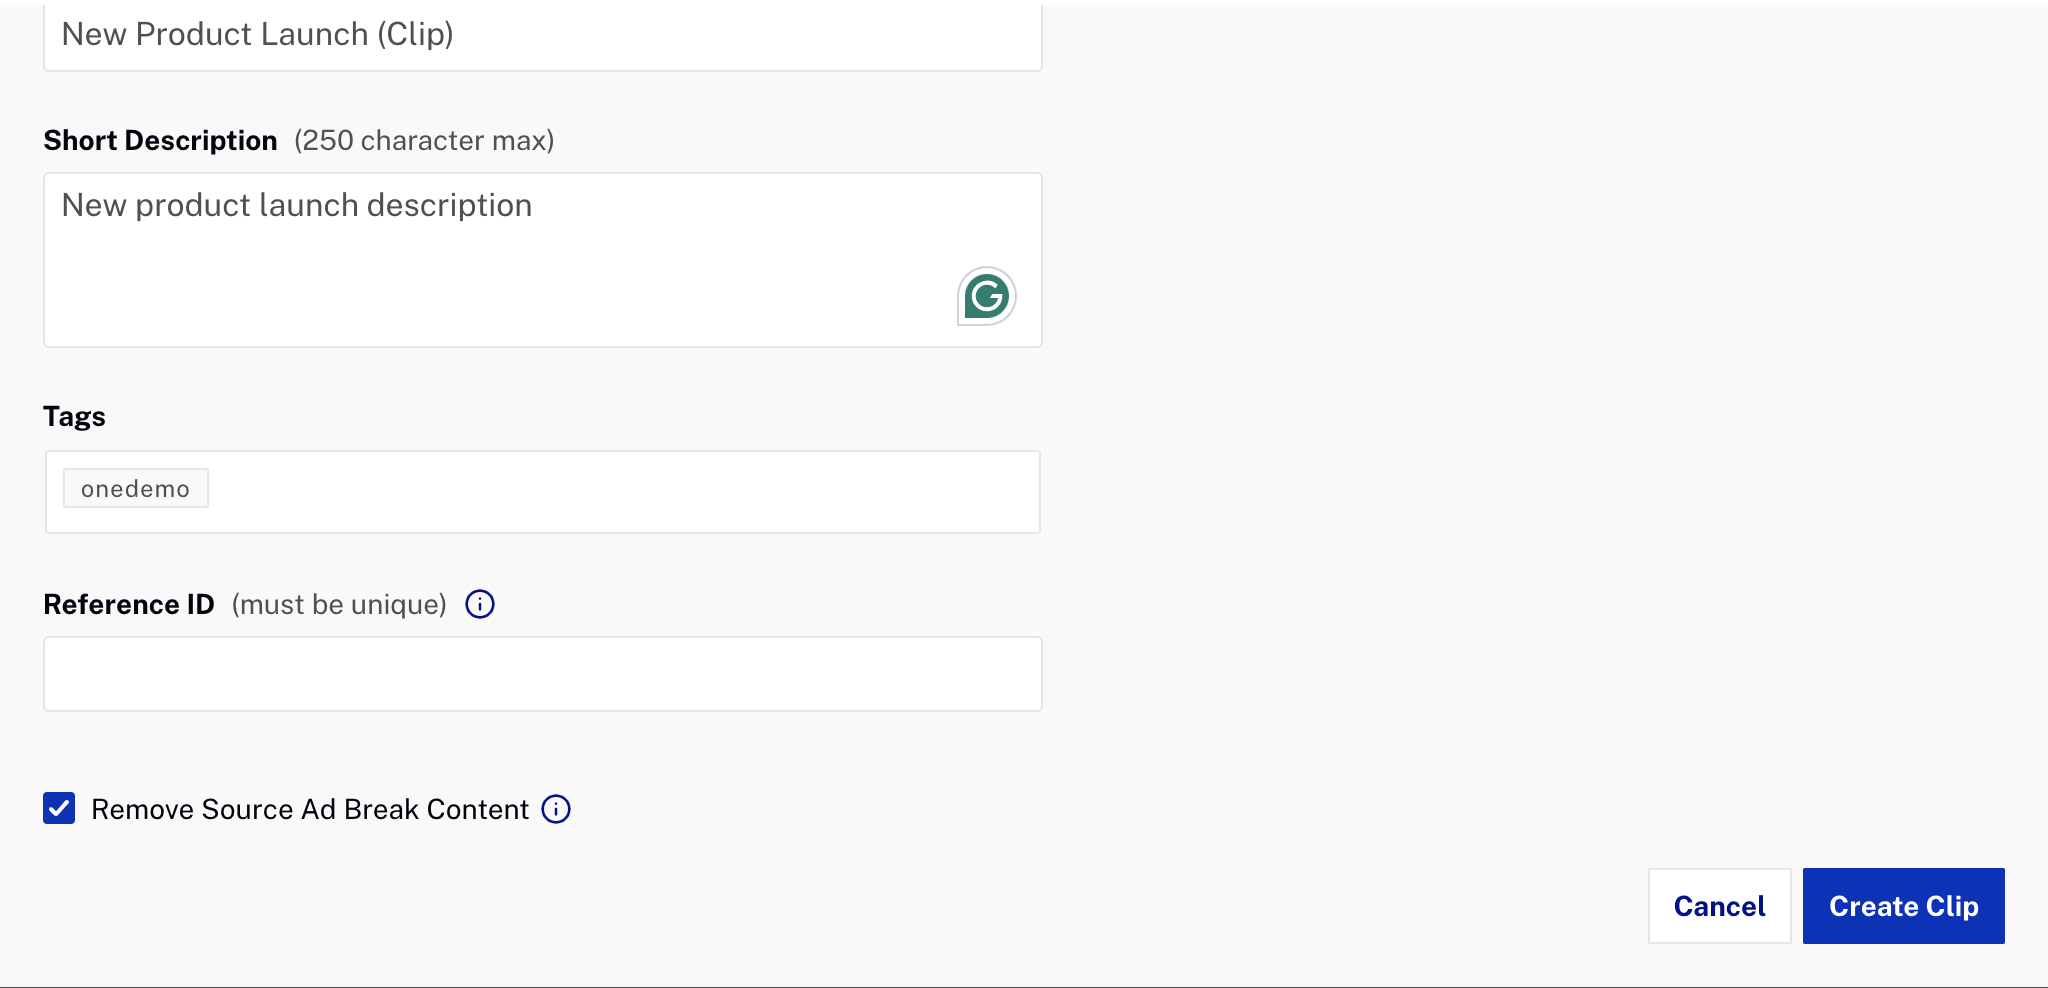
Click Create Clip. The transcoding process for the clip will begin. Clips are transcoded using the default ingest profile for the account.
A list of all clips will appear below the clip editor. Clicking the Clip Name will open the clip in the Media module in another browser tab. Click Publish to Social to open the clip in the social module to publish it to a social media account.
Preview player
The preview player is used to preview the clip. When the event is in progress and the clip editor is opened, the clip will begin to play from the "safe live point" which is approximately 3 segments before the end. Note that not all browsers support autoplay.
Playback control buttons
The playback control buttons are used to control the playback of the clip inside of the preview player.
| Button | Description |
|---|---|
 |
Jumps to start of video |
 |
Jumps the playhead back 15 seconds |
 |
Starts video playback from the playhead position |
 |
Jumps the playhead forward 15 seconds |
 |
Jumps to end of video |
 |
Jumps to live point in the video (only available when the live stream is active) |
Clip time
The clip time displays the current UTC time for the playhead and the clippable time. Clicking on the UTC link will switch to the local time display.

Clipping buttons
The clipping buttons are used to clip the desired portion of the source video.
| Button | Description |
|---|---|
 |
Jumps to cue-in point of the video |
 |
Sets the starting point of the clip at millisecond-level precision. The start point can also be set by dragging the handle at the beginning of the focus timeline. The time display uses the format hh:mm:ss.mmm (e.g., 01:23:45.678). |
 |
Sets the ending point of the clip at millisecond-level precision. The end point can also be set by dragging the handle at the end of the focus timeline. The time display uses the format hh:mm:ss.mmm (e.g., 01:23:45.678). |
 |
Jumps to the cue-out point of the video |
The cue-in and cue-out points are the start and end of a clip. Each of these points is represented on the focus timeline with a draggable handle, and the time between the points is filled-in green. Dragging either handle sets the point at millisecond-level precision. The points are also represented in the context timeline as the left and right edges of the green rectangle indicating the clip space.

Preview clip
Click the preview clip button to play the clip.

Playhead
The playhead is an indicator of where in time the player is playing. The playhead is represented in the focus timeline by a red line with a red circle on top and with a red vertical line in the context timeline.
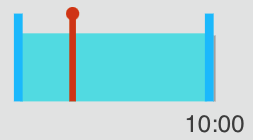
On the focus timeline, the playhead may be dragged to scrub through the video. Double-clicking on the focus timeline will move the playhead to that point. The playhead can also be used to set cue-in and cue-out points using the cue-in/cue-out buttons or by using the keyboard shortcuts.
Focus timeline
The focus timeline is the top timeline in the interface.
The playhead is an indicator of where in time the player is playing. The playhead is represented in the focus timeline by a red line with a red circle on top.

The green shaded area represents the selected clipping time, where the edges are also draggable. Please note that the UI pre-selects the clip duration according to the total available clipping time. For example, in events greater than 10 minutes, the last 10 minutes will be pre-selected, similarly, for 30 and 60 minutes.
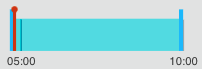
Context timeline
The context timeline is the bottom timeline in the clip editor. The context timeline shows the entire duration of the video, regardless of zoom level, the selected area of the clip, the location of the playhead, and the current focus viewport. The timeline is indicated with a red line.

Zoom buttons
The zoom buttons are used to zoom in or out on the focus timeline.
| Button | Description |
|---|---|
 |
Zooms in the focus timeline. The focus viewport (white box) in the context timeline will show the area of the clip that is being displayed in the focus timeline. |
 |
Zooms out the focus timeline. The focus viewport (white box) in the context timeline will show the area of the clip that is being displayed in the focus timeline. |
List of clips
A list of clips will appear below the clip editor. Click Publish to Social to publish the clip to one of your social destinations using Brightcove Social.
Keyboard shortcuts
Keyboard shortcuts can also be used to play and create a clip from the video. The following keyboard shortcuts are available.
Playback controls
| Press this key | To do this |
|---|---|
space, k, down | Play / Pause |
I | Go to cue-in |
O | Go to cue-out |
p | Play preview |
j, left | Jump back 1 frame |
J, shift + left | Jump 1 second back |
l, right | Jump 1 frame forward |
L, shift + right | Jump 1 second forward |
s | Jump to start |
e | Jump to end / live |
Timeline controls
| Press this key | To do this |
|---|---|
i | Set cue-in |
o | Set cue-out |
+ | Zoom in |
- | Zoom out |
u | Pan timeline to playhead |
? | Open help modal |