Implementing Server-Side Ads in the Live Module
Introduction
The Live module supports Server-Side Ad Insertion (SSAI) so server-side ads can be requested and displayed during a live stream. SSAI provides these main features during live events:
- Since ads are stitched into the live video stream on the server side, they are not affected by ad blockers
- Ads are inserted at cue points sent from your encoder or you can create an instant cue point using the Live module Control Room
- You can configure fill slates to fill any unused ad time
This topic focuses on the settings required and the process to request a server-side ad during a live event.
Configuring the server-side ad settings
Before server-side ads can be delivered, server-side ad settings must be configured. The server-side ad settings define various aspects of ad playback, including ad calls, timing, beacons and other ad configuration options. These settings are configured as part of the Server-Side Ad Settings in the Admin module. In this example, a simple ad tag is defined.
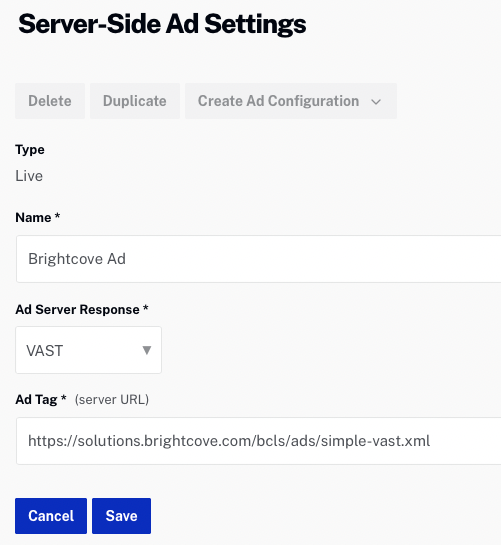
For more information, see Configuring Server-Side Ad Settings.
Configuring the fill slate
Fill slates are videos that will be displayed when there are gaps in a live stream ad break that cannot be filled with a dynamically-served ad. If the requested ad is shorter than the ad break time, the fill slate will be displayed so viewers don't see a blank player. You should configure at least one fill slate before requesting a server-side ad. Ad slates are configured as part of the Live Settings in the Admin module. In this example, a fill slate that displays the Brightcove logo was defined.

For information on creating ad slates, see Managing Live Settings.
Creating a live event that supports server-side ads
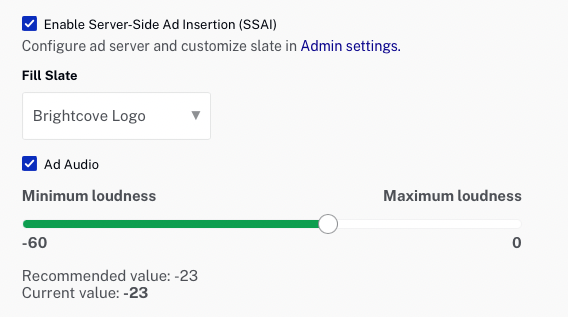
In order for a live event to display server-side ads, the Enable Server Side Ad Insertion (SSAI) setting must be selected when the event is created. For complete information on creating a live event using the Live module, see Creating and Managing Live Events using the Live Module.
To create a new live event that supports server-side ads, follow these steps.
- Open the Live module.
- From the Manage Events page click .
- Enter the event details as needed.
- Click Advanced Options to expand the advanced options.
- Check Enable Server Side Ad Insertion (SSAI). This will enable server side ad insertion.
- Select a Fill Slate. The fill slate will be displayed when there are gaps in a live stream ad break that cannot be filled with a dynamically-served ad.
- When the Ad Audio setting is checked, the audio levels on ads will be normalized based on the adjustment that is set. This can be used as a way to help make sure ads aren’t significantly louder than the content. Brightcove recommends selecting this option.
- Click .
- The Control Room page will open with details about the live event including the Streaming Endpoint (RTMP URL) and Stream Name. These values will be used by the encoder.
- Configure the encoder and start the live stream.
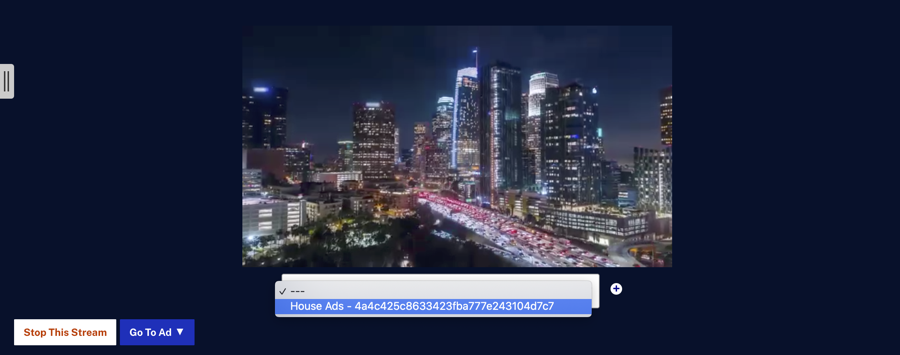
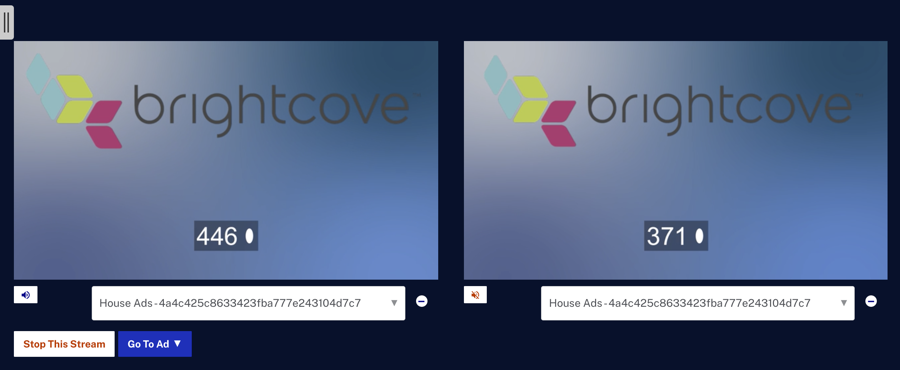
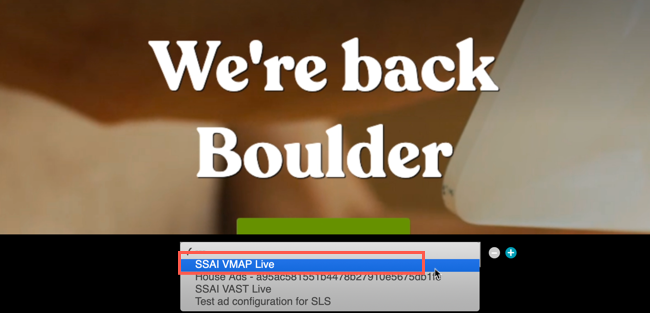
- By default, the Control Room preview player shows the ad-free stream. Ads will not be shown in the Control Room unless a Live ad configuration is selected. Use the dropdown below to the player to select an ad configuration.
- (Optional) Click the plus button (
 ) to select an additional ad configuration. Doing this will add another preview player on the Control Room page.
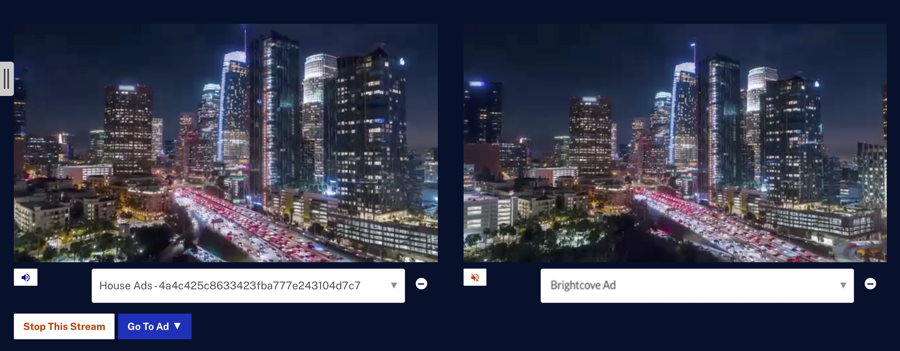
Click the volume button below the preview player to control which player audio stream is active.
Use cases for using an additional preview player include:
- To preview two ad configurations
- To see the un-altered feed (non-SSAI) alongside the feed with ads (SSAI)
Requesting an ad
To request an ad, click . When clicked, the length of the ad break can be selected.
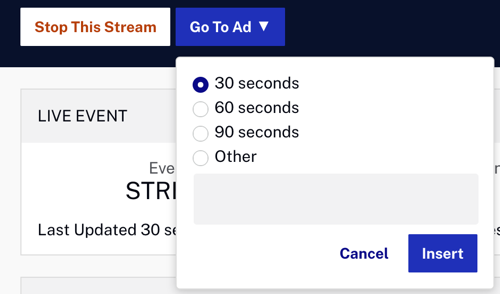
Click to insert an ad break into the live stream. If the ad doesn't fill the entire ad break time, the fill slate (selected when the event was created) will be displayed. Ads will be seen in the Control Room preview player and in players that are published using the Live module. This example shows 2 ads being displayed in the Control Room.
Publishing the live event
Live streams with server-side ads cannot be published using the Media module, they must be published using the Live Module.
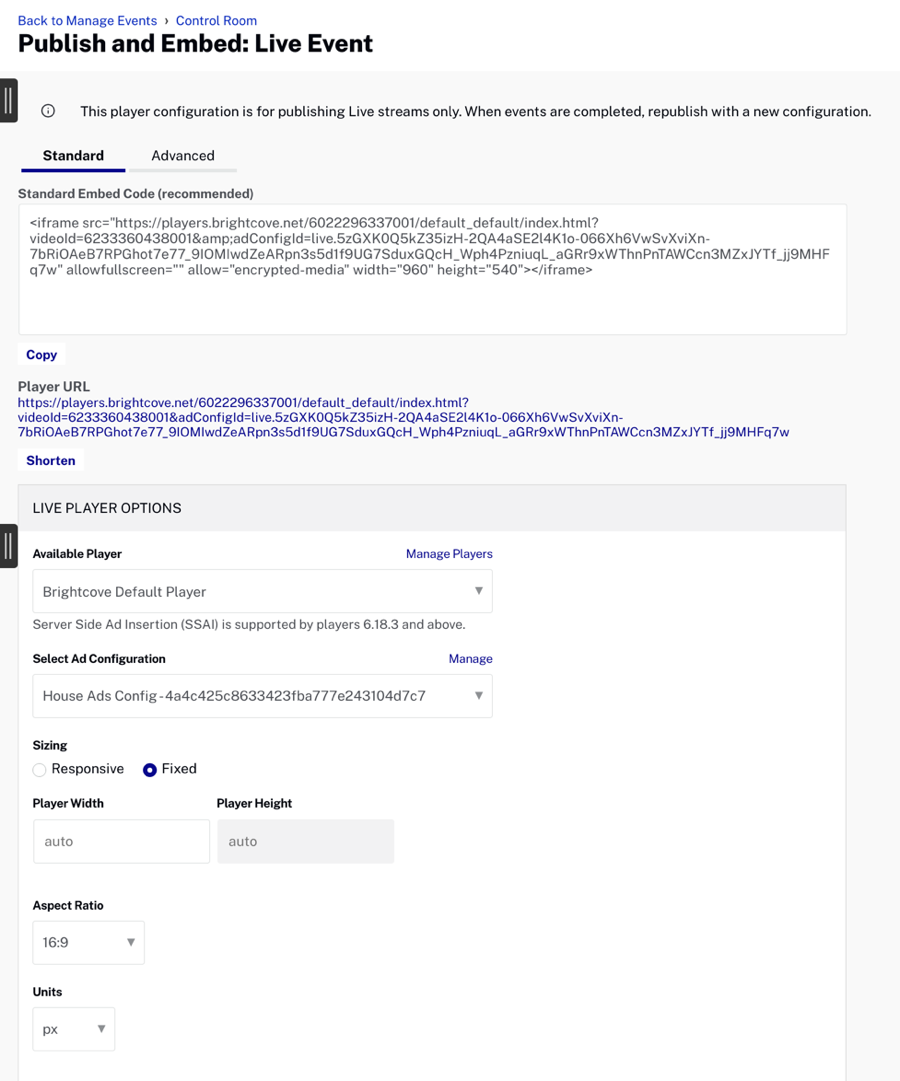
To generate the embed code for a live event with server-side ads, follow these steps:
- Click on an event to open the Control Room page.
- Click Publish and Embed in the left navigation.
- Select an Available Player.
- Select the Ad Configuration to use with the player. The ad configuration will determine which ad(s) appear in the player.
- Click the Player URL to preview the event in a browser or copy the appropriate embed code to use.
Publishing a remote live event
If you want to publish a remote live event, follow these steps:
- After creating your live event by following the steps listed above, return to the Live module's Control Room.
- If you know the value of your ad config id, then you can insert it into the playlist URL.
In the Live module's Control Room, copy the Playback URL.

Playback URL Next, insert the ad config id (045f90cfd55187ff6e60c8) that you want to use to the URL as follows:
https://bcovlive-a.akamaihd.net/21e83ff8c229478e8c81416838eb6e1f/us-west-2/NA/045f90cfd55187ff6e60c8/playlist.m3u8Then, rename the playlist from
playlist.m3u8toplaylist_ssaiM.m3u8. The remote asset should look similar to this:https://bcovlive-a.akamaihd.net/21e83ff8c229478e8c81416838eb6e1f/us-west-2/NA/045f90cfd55187ff6e60c8/playlist_ssaiM.m3u8Skip to step 6 and use this playlist URL.
- If you don't know the value of your ad config id, you can get the complete playlist URL as follows. Select the ad configuration that you want to use.
Select ad config - For your browser, open the network console tab. In this case, we are using the Chrome browser.
- In the network console, search for "playlist_ssaiM". Copy the URL that ends with "playlist_ssaiM.m3u8". You may have to refresh the page and re-open your network tab.
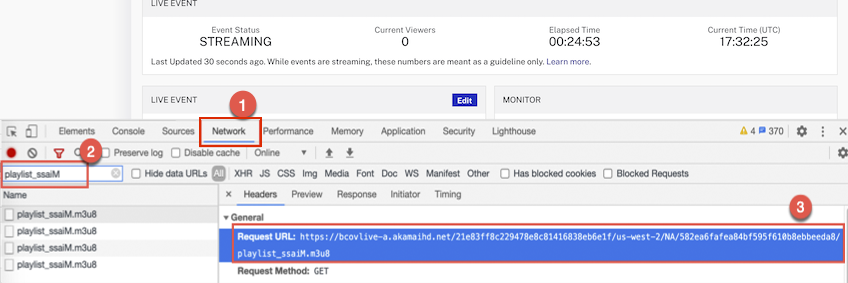
Network console In this example, the URL is:
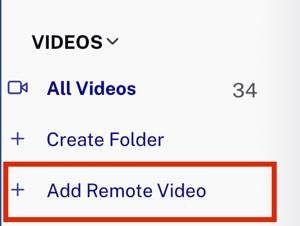
https://bcovlive-a.akamaihd.net/21e83ff8c229478e8c81416838eb6e1f/us-west-2/NA/582ea6fafea84bf595f610b8ebbeeda8/playlist_ssaiM.m3u8 - In Studio, navigate to the Media module and create a new Remote asset pointing to the playlist URL from the previous step. In the left-side menu, select + Add Remote Video.
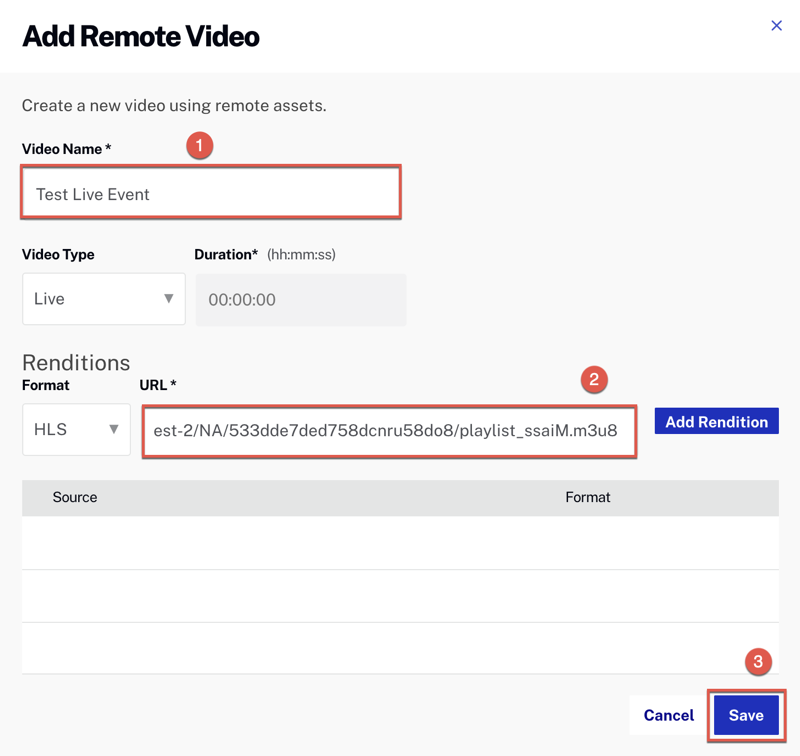
Add Remote Video - In the Add Remote Video enter a Video Name and the playlist URL. Select the Save button.
Add Remote Video dialog - You now have a video Id pointing to your remote live stream. You can use this with any player in your account to stream live content with server-side ads.
Troubleshooting live stream issues
If you need further help getting your live event to work, you can contact us. To make sure you get the fastest response possible, below is a list of what support will need to solve the problem.
- The specific symptoms the stream is having. For example, does it not play at all or does it stutter or freeze?
- Whether this stream worked correctly in the past
- The entry point URL you are using in your encoder
- The encoding software and hardware are you using
- The URL to the player to which you have published the live event
- The video ID of your live asset
- The results of a trace-route from your encoder to the publishing point host